Tuesday, April 16, 2024

second chance…

Yay! Completed the sleeve, no problem, at least 5gs left! So happy, I jumped right in to get that neckband done! My memory is not quite what it used to be but even though I think I know what I’m doing, it has been a few weeks since I made all those swatches. I did what I thought was going to work with the English rib happening on the rib bed and, almost holding my breath, hung the neckline. I’ll admit, even though I’m usually telling you to get rid of the waste yarn once you’ve got every thing hung, I left it on the neckline, just in case! Ha! Didn’t need it! Looks good! Can hardly wait to get this all finished up, and washed and dried, to show you!

In case you're really following along (I can only hope), here's what I did:

1. 75-0-75 ns. Swing P5. Arrange for 1X1 rib. Manual wrap cast on.

2. RC000.T5/5, K1R. Hang comb and weights. Bring ns out to make sure that all is well.

3. T4/4. K8R. T7/7, K1R (fold row). T4/4. K8R.

4. CAR. Set for English rib, tuck on RB. K2R.

5. Swung English rib: Rack to P7, K2R, rack to P5, K2R for 8 rows. You should be back at P5.

6. On MB, bring empty ns to work. Transfer all to MB.

7. Hang neck edge sts from WY with RIGHT side facing you. There will be 2 sets of sts on needles.

8. Stockinette, garment tension, K3R. Remove on WY. Join other shoulder and seam neckband. Backstitch the 3 rows of plain knitting to front of garment, stitching through open loops of last row of main yarn.

9. Fold cast-on edge to inside and handstitch with running stitch, loosely to last row of 1X1 above racking.

Tuesday, April 9, 2024

r.o.y.a...

That’s running-out-of-yarn-anxiety! 

Just to recap, I had a small cone of 70g and an almost full cone, 490g, both ‘surf’ but turns out they’re different dye lots! They look the same on the cone but we’ve all been there - that line when you add the next one in tells the tale! What I’m doing to disguise it is using the small cone for the ribbed bands - 10 rows of 1X1 on the body, just enough to hem it and hold it down, and, 30 rows of 2X2(2X1) industrial rib for the cuff, giving it a little more oomph and body for a man-cuff -  the line created by the variance in the stitches between the rib and the 1RT will be enough to hide the dye lot differences. 

Back is done, it weighs 160g; Front, 158g. First sleeve done and there’s 74g left on the larger cone. Do the math and the first sleeve took 74g…oh, man that’s gonna be close! Normally, after the back and front, I’d join one shoulder and do the neckband especially after all those practises but I don’t dare, even though I’m using a different yarn for the neckband…gotta make sure to get the second sleeve before putting it all together, just in case!

Friday, April 5, 2024

revision…

After the second neckband swatch, added to the opposite side of the tension swatch, I noticed there was something weird happening after the RTR (remove, turn, rehang).  Maybe it wasn’t a mistake - possibly it just showed up more in the cotton because there’s better stitch definition than the wool used in the NBT sample. And then I thought, what the heck! Why am I doing that RTR? 

Actually it’s because for this neckband technique to work properly, you need to have the wrong side of the neckband facing you when the right side of the neckline is hung on top. But I meant, why? If I switch the tucks of the English rib to the bottom bed, making the side facing the wrong side, there won’t be any need for that RTR! Why didn’t I think of that before? 


After the third swatch which didn’t really work - I forgot that for the swung English rib to form properly you needed to rack after the tucks and, when that was sorted, on the 5th neckband swatch I decided maybe it would be nice to double under the 1X1 rib because, in the cannele cotton, which is slightly thinner than the Bonita cotton, the 1X1 rib cast-on was looking a bit wimpy…would the wash and dry sort that out? 

Omigosh! And I thought making a pullover would be quick and easy! 

Wednesday, April 3, 2024

shades of...

Back to the Suva situation, I had already made a couple of swatches, with the ‘surf’ a pale blue/gray and cream combination-it’s hard to tell what colour is predominant and it seems to change with the lighting. In my mind I wanted to use a contrast colour for the neckband at least - couple of reasons - manfriend has a very harsh beard/stubble, even though he shaves daily - it’s almost like a wire brush and I’ve noticed if he has a close-fitting neckline and a softer fabric, it gets abraded and brushed-looking so I hoped using a mercerized cotton, like Bonita or Cannele would make a harder-wearing neckband than the Suva which is quite soft. 

In my first swatch, I used light blue on one side and did the contrast rows in the ivory/cream shade.  After the wash and dry, decided I didn’t like the light blue - too different - so went with the ivory/cream/ecru colour for the swatch of the neckband. 


That seemed to have a peachy tint next to the Suva! And, of course, there’s that ROYA (running out of yarn anxiety) - my Pebbles used only 350g of the Suva but I’m doing this on T8 which will take more yarn so it’s always good to have a plan B!

BTW, the T9 swatch (pebbles), after wash and dry was 25 sts and 42 rows. This one, at T8, same pattern, is 28 sts and 54 rows - wow! That one number tighter makes a big difference!

I picked one of those ‘fancy ribs’ neckband from NBT, the one with the swung English rib…

Tuesday, March 26, 2024

what the...

Omigosh! you guys! I love all these comments on that last post especially! tells me you’re reading! 

Thanks, Tom - you’re way too nice! You didn’t see the 98 deleted photos! ;)

No, no actual pattern! I’m past that - too many issues to consider in what yarn, etc and no one is buying anyway! 

What I have been trying to do is provide you with the inspiration and resources (my books, and more specifically here, my The Handbook for Manual Machine Knitters - HMMK) to make your own design - how to use the information you already have and spin it into a great garment! 


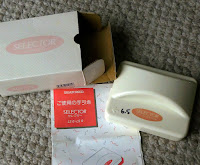
And then, what the heck is a ‘needle bettle’? No worries, I googled it and seems it’s a knock-off of the old Silver Reed needle selector - but it did say that it brings the needles to D rather than C which is what the LS6 (which had the built-in option of being converted for use on the 9mm hobby knitter) did and you then had to use the flat side of the needle selector to put them in D position for tuck or fairisle. 


But the big thing is they all only select an 8-stitch repeat. So, it’s handy for that but considering the price as opposed to the number of patterns you could use it on…

My NP diamonds repeat was a 10-st repeat and you could redesign the diamonds to an 8-st…so, yes you can use that thingy to select the needles for an 8-st repeat lace pattern or a 4-st or a 2-st…except the needle is in D position and for me at least, to try and hook your transfer tool onto it when it's stuck way out like that, not so much!

I have had that LS6 for at least 30 years  - it retailed for $24! and I did use it a couple of times but that 8-st repeat is quite limiting and it was only available for a very short time, probably why I haven't talked about it before.

Saturday, March 23, 2024

confession...

Remember that NP pullover I was making around Christmas time - on the LK150, with that tweedy Forsell - here’s the start of the story and it went on and on…http://knitwords.blogspot.com/2023/12/hand-knit-or.html 

I never did post a photo because even my plan B didn’t really work - it still looked dorky! The length was all wrong!

Buoyed by my victory of lengthening manfriend’s plain pullover, I was wondering how I could knit down on the NP sweater. Obviously, more rib, the ‘easiest’ way, wasn’t working. Could I pull off the rib, rehang it and maybe add another section of patterning and then rib again? I know stockinette works knitting down but what happens with a lace transfer? Should I try a different stitch pattern? I could play around with the tension swatch but why bother? ‘Just jump right in’ could be my middle name!

If you remember, I made the Back 
http://knitwords.blogspot.com/2023/12/could-you-tell.html

with the plain diamond pattern only,  so I figured, may as well start with that - if I mess it up, oh well, I wasn’t going to wear it anyway and the plain lace was easier. 


Omigosh! It worked! A very close, trained eye could notice the difference but not enough to bother me! Got the Front done, with the two-step transfer and again, there is a slight difference but no one would notice when the garment is on a body and the neckline and shoulders detail look so great!


One tip, when I did the ribs originally, I hung the stitches and said to leave the waste yarn in as a marker row for where to drop the stitches down to. 


No waste yarn here, so to make a marker row, bring all needles out and manually, with a smooth, good-contrast colour, like the ravel cord, weave up and down (over one and under the next) across the row.  When you knit the next row, that strand is woven across to mark the row - easily pulled out after!


Wednesday, March 20, 2024

knitting down…

After that outstanding success with Pebbles, I wanted to use Suva again and go with another neckline from NBT - more on that later, because I also figured I’d make it for manfriend - he hasn’t had a new sweater in some time so I went looking for one of his old ones to measure and figure out what to do. I came across one from 2012 - it was totally plain, (so plain, I never even told you about it) standard gauge stockinette, hems and all, in a really nice tweedy, burgundy/ivory Jagger Bros cotton/wool yarn that I totally recall thinking I should never have used for him - could have kept it for moi! He hasn’t worn it in forever and I wondered why. 


When he came by, turns out it’s a wee bit too short to wear comfortably. Not sure why. Was it always? did it shrink? what? who knows but, weirdly, I still had the remainder of the leftover yarn/cone, about 330g. Actually found my original schematic with stitch/row and tension details - what an incredible filing system - it was the only thing under miscellaneous! - and you know how I love a challenge. 


It was originally knit bottom to top, regular-like, beginning with a hung stockinette hem. I carefully unpicked the bottom of the side seams and to get rid of the hem, the easiest thing to do was pull the strand above the hem to take off the entire hem.  I know you’re kinda panicking and saying what the? But, knitting doesn’t unravel from the bottom - you have to work at it to lose a stitch. Rehung the stitches, easy enough, T8, knit 20 rows, transfer to 1X1 rib,  T7/7, (didn’t want the hem to pull in, just stay the same width and stop it from curling up)10 rows, ending carriage at right. Dialled up T10/10, knit a very loose row, transferred it all up and chain cast-off for a total of about 8 new  cm. Repeat for second piece, stitch the sides back up and Bob’s your uncle! 

You can’t even tell it wasn’t born that way!

Heh-heh, now he doesn’t need another new one!